4.35 out of 5 stars
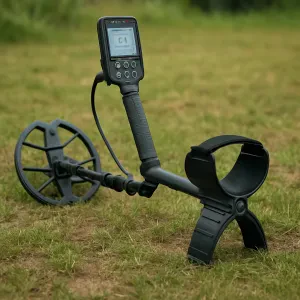
Garrett ACE 300 Waterproof Metal Detector + Accessories
Discover hidden treasures with the Garrett ACE 300 Waterproof Metal Detector and its range of must-have accessories
Product information
Product Review Score
Product links
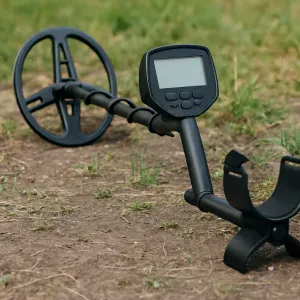
Making a pinpointer metal detector can be a fun and rewarding DIY project. Pinpointers are handy tools for metal detecting enthusiasts as they help locate the exact position of a metal object within a small area, making the digging process more efficient. Here's a step-by-step guide on how to make a basic pinpointer metal detector:
Materials Needed for Homemade Pinpointer:
1. Battery holder (with switch, if possible)
2. Vibrating motor
3. PVC pipe (around 10-12 inches long, 1 inch in diameter)
4. Metal rod or coat hanger wire
5. Wire
6. Electrical tape
7. Glue (hot glue or epoxy)
8. Metal detector coil (optional, salvaged from an old metal detector or purchased online)
9. Battery (typically a 9V battery)
Tools Required:
1. Soldering iron and solder
2. Wire cutters and strippers
3. Drill with drill bits
4. Hot glue gun (if using hot glue)
Step-by-Step Instructions for Homemade Pinpointer:
1. Prepare the PVC Pipe:
- Take the PVC pipe and cut it to your desired length (usually around 10-12 inches). This will be the main body of your pinpointer.
- If necessary, sand the edges of the PVC pipe to smooth them out.
2. Prepare the Metal Rod:
- Straighten the metal rod or coat hanger wire. This will be used as the probe for your pinpointer.
- Cut the metal rod to a length slightly shorter than the PVC pipe, leaving enough space for the components to fit inside.
3. Install the Vibrating Motor:
- Drill a hole near one end of the PVC pipe large enough to fit the vibrating motor snugly.
- Insert the vibrating motor into the hole and secure it in place using glue (hot glue or epoxy). Make sure the motor is positioned in a way that the vibration can be felt when holding the pinpointer.
4. Wire the Motor:
- Solder wires to the terminals of the vibrating motor.
- Connect the wires to the battery holder, making sure to leave enough slack to allow for movement.
5. Attach the Metal Rod:
- Drill a hole through the center of the PVC pipe near the opposite end from the motor.
- Insert the metal rod into the hole, leaving a small portion sticking out of the end of the PVC pipe.
- Secure the metal rod in place using glue, ensuring it is firmly attached to the PVC pipe.
6. Connect the Circuit:
- If you have a switch on your battery holder, make sure it is in the OFF position.
- Connect the positive terminal of the battery holder to one terminal of the vibrating motor.
- Connect the negative terminal of the battery holder to the metal rod.
7. Test Your Pinpointer:
- Turn on the switch (if available) and hold the pinpointer in your hand.
- Bring the metal rod close to a metal object. The vibrating motor should activate, indicating the presence of metal.
8. Optional: Add a Metal Detector Coil (Optional):
- If you have access to a metal detector coil, you can attach it to the end of the PVC pipe opposite the motor using glue or tape.
- Wire the coil to the circuit in parallel with the vibrating motor.
9. Final Assembly:
- Once everything is working correctly, secure any loose wires with electrical tape to prevent them from getting snagged or damaged.
- Optionally, you can decorate the PVC pipe or add a handle for comfort.
Your homemade pinpointer metal detector is now ready to use! Experiment with different settings and adjustments to optimize its performance for your metal detecting adventures. Happy hunting!
$109.99
4.19 out of 5 stars
Garrett Pro-Pointer AT: Waterproof Pinpointer
Unleash your treasure hunting potential with the waterproof Garrett Pro-Pointer AT Detector
Product information
Product Review Score
Product links